First Time User Guide: Recording Application
To kick off our First Time User Guide series, this article walks through the process of downloading, installing and creating your first session in TopMod QA.
This process has been designed to be as streamlined as possible whilst also giving you control over what you capture and when.
User Guide
1. Download & Install Application
To download the latest version of the Recording Application, login to your TopMod QA account in the TopMod QA dashboard by visiting here: http://app.topmodqa.com/ and entering your login details. For more information on how to login to the dashboard, please read our First Time User Guide for the Dashboard.
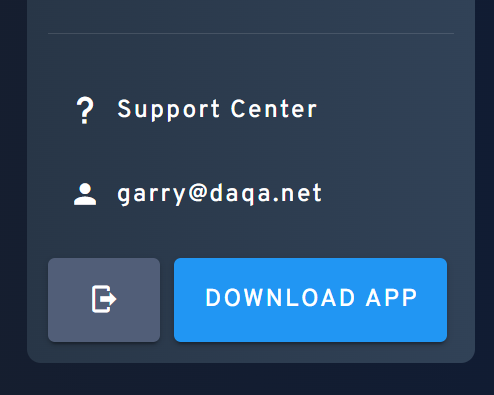
After logging in, click the "Download App" button in the bottom left of the screen - as seen below.
After downloading, locate the installer and follow the installation process. Please note, due to the level of data capture taking place within the recording process (user inputs and performance data), this application does require you to restart your machine as part of the installation process.
2. Login

After downloading and installing the latest version of the Recording Application, opening the application will take you to the Login screen as seen above. Enter the same login details you entered into the Dashboard to continue.
3. Homepage
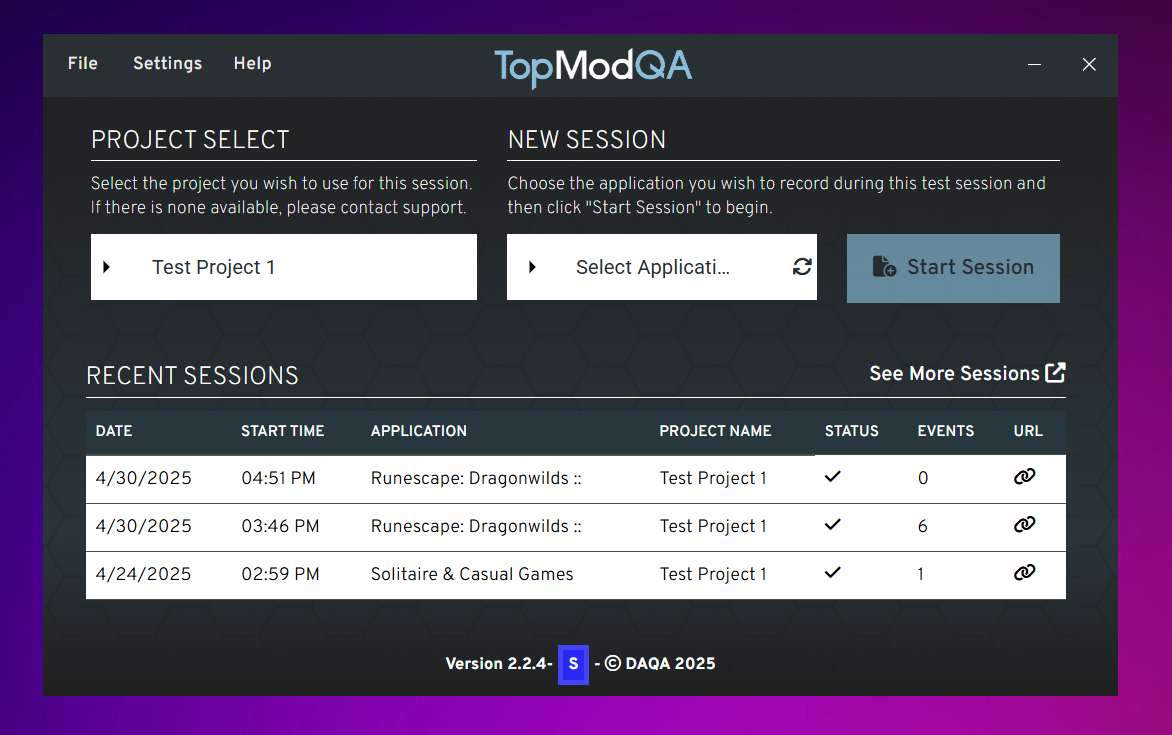
The first screen to become familiar with is the Homepage. On this screen, you have the ability to view your latest Sessions, start a new Session, check your Settings or visit the Support Centre for more information.
As our focus is on recording your first Session, we are going to focus on the specific features to do this.
4. Checking your webcam and microphone
As TopMod QA offers the ability to capture the users webcam and microphone during any recording, it's best to check in your Settings to ensure they are properly being picked up by the application. To do this, click the "Settings" button in the top navigation bar.
This will open the Settings screen and you should see that the Application has detected your webcam and microphone automatically. If you have multiple devices connected and would like to change which device is being used, click the white box and select the new device from the dropdown menu.
If you are not seeing a device being picked up by the Application, try restarting your Recording Application and the host PC to see if this helps connect the device to the application. If you continue to have problems, please reach out to our Support team at support@topmodqa.com.
Once you have tested your devices are working properly, click the "Save & Close" button in the bottom left of this screen. Clicking this button will save your settings for future recordings and ensure you do not have to do this each time you want to start a new Session.
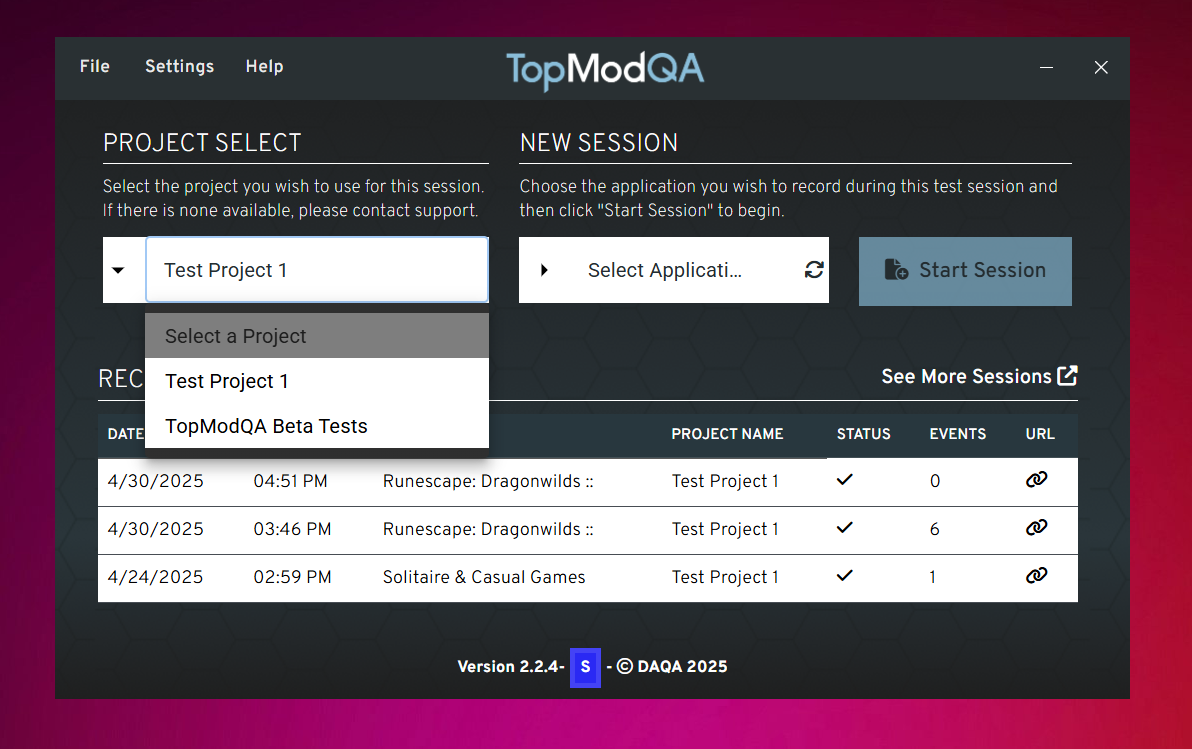
5. Project & Application Select
After saving your settings, you will be redirected to the Homepage. From here, we are going to start the process of setting up a new Session. To start with, you will need to select which Project this Session will be for. To do this, click on the dropdown menu (white box) below the "Project Select" header.
From there, you will need to select the application you are going to focus on during this Session. To do this, click the white box with "Select Application" in it. This will provide you with a list of all the applications currently running on the host PC. Select the application you'd like to focus on.
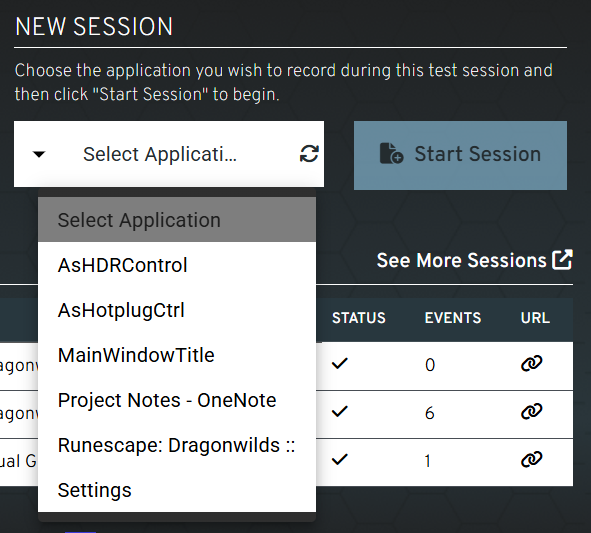
Please note, if you do not see your target application in this list, click the rotating arrow icon on the "Select Application" menu. This will refresh the list of Applications and you should see your target application appear.
6. Start Session
Once you have selected your Project and Application, click the "Start Session" button to begin.
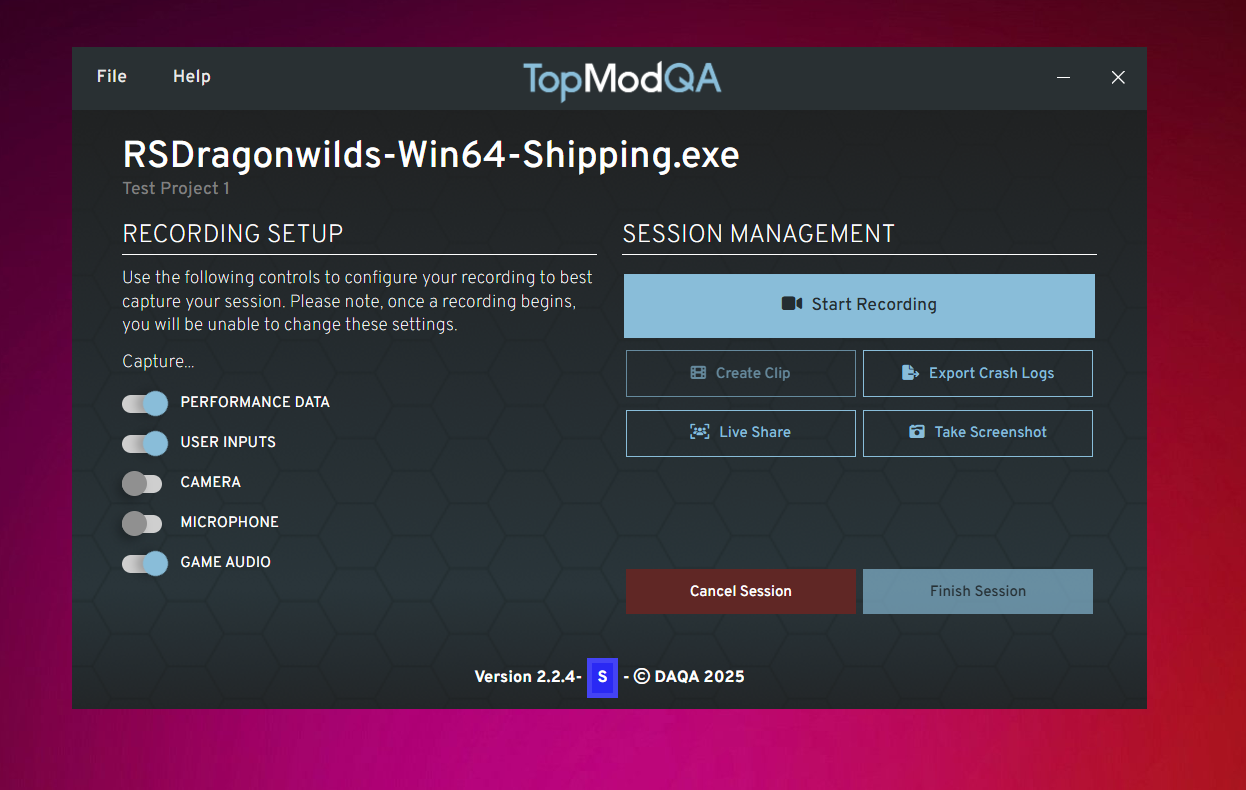
You will then be taken through to the Session page which will be your primary hub for this Session. In here, you will have the ability to configure what is being captured as part of the recording, as well as being able to manage the Session itself.
7. Recording Setup
As this is our first Session, we should configure what inputs you'd like to capture as part of this Session. It's important to remember that this can be configured for different Events inside the same Session so anything you set here now can be updated again as you progress through your testing session.
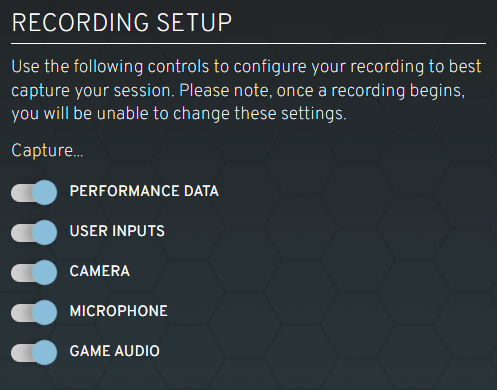
To turn any specific captured input off, simply click the toggle next to its title.
8. Session Management
Once you have set your capture inputs, you are ready to begin capturing Events. As outlined in our supporting article, Events form a key part of the new TopMod QA setup. Grouped by Sessions, Events can be any Recording, Clip or Screenshot you capture whilst testing.
A Recording represents a long recording of the test session, it may be of your entire test session or if your test session is long, you may break this up into multiple Recordings. Whereas, a Clip is a short video clip taken from your main Recording. This is great if you encounter a bug in your session and would like to include the footage on a bug report.
The Session Management panel houses all of your controls for your Events. Please note, to create a Clip, you must have already been Recording so it's our recommendation to start recording as soon as you start your test session to avoid missing anything of value.

There are also two additional Events in the Session Management panel. We are not going to cover these in this article but you can read more about them here: Further Information: A... | TopMod QA DocsFurther Information: S... | TopMod QA Docs
9. Capture Screenshot
At any time, you may wish to capture an image at any time whilst you are running your Session. To do this, simply click the "Take Screenshot" button in the Session Management panel. This can be done without the main Recording running.
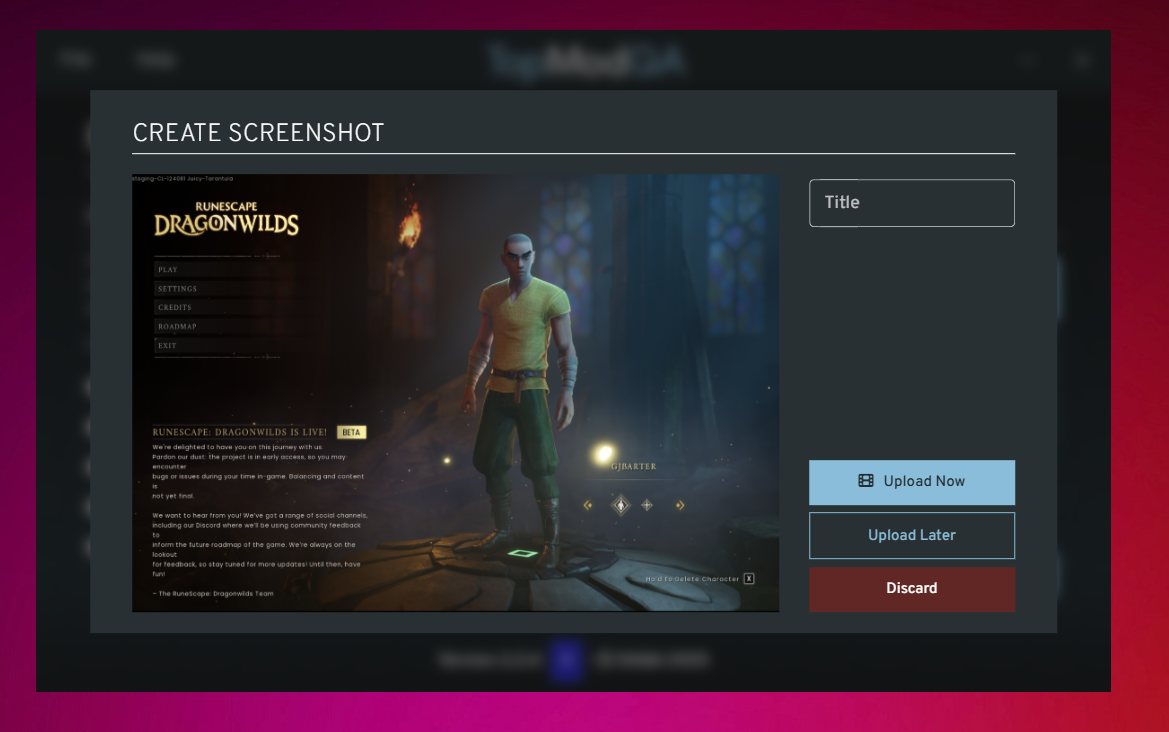
Upon the capture of the Screenshot, you will be presented with the above modal showing the Screenshot that was captured. This capture is done in the native resolution of your screen so can be great for sharing any UI or text issues you encounter in your test session.
When reviewing the captured Screenshot, if you would like to keep the Screenshot so you can share with others, add a Title and click the "Upload Now" button. This will immediately begin the upload process and it will become available in the Dashboard whilst the rest of your Session continues.
If you are unsure of whether you'd want to upload the Screenshot, or you do not want to impact your network connection, you can choose to upload the Screenshot later by selecting "Upload Later". If you do not want to keep the Screenshot, click the "Discard" button.
In this instance, click the "Upload Now" button.
10. Start Recording
As the aim of this article is to demonstrate how to record your test session with TopMod QA, we're now going to show how to create recordings. To begin recording, click the "Start Recording" button in your Session Management panel.
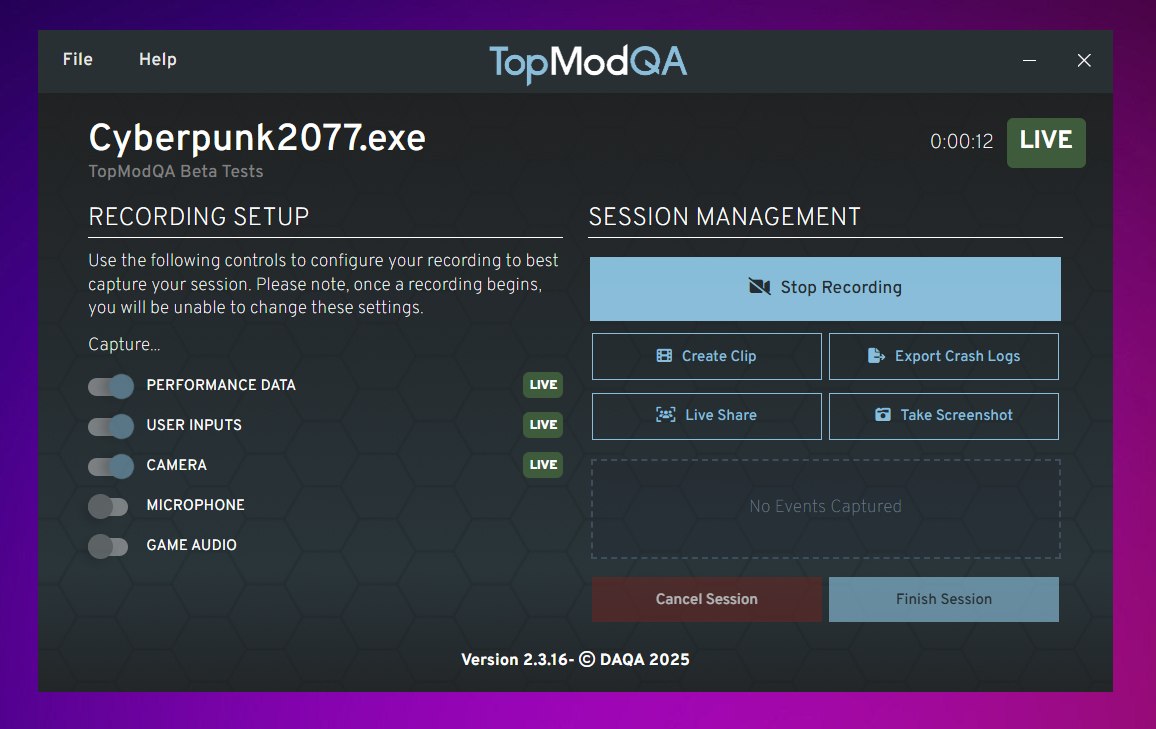
Once the application is recording, you should see a number of UI elements change on the Recording Application. Firstly, you should see a number of "Live" states appear, this will show you whether the full application is capturing the gameplay from your chosen application, as well as any additional inputs you've selected in the "Recording Setup".
If any of these "Live" tokens show as "Error", this means the Recording Application is unable to capture that specific element. Try restarting the recording and if the error persists, try reloading the Recording Application and restarting the host PC. If the issue persists, please contact support at support@topmodqa.com.
11. Create Clip
As your test session continues, you may encounter a part of the game that you'd like to specially capture and upload to a bug report ticket. To do this, click the "Create Clip" button in the Session Management panel.
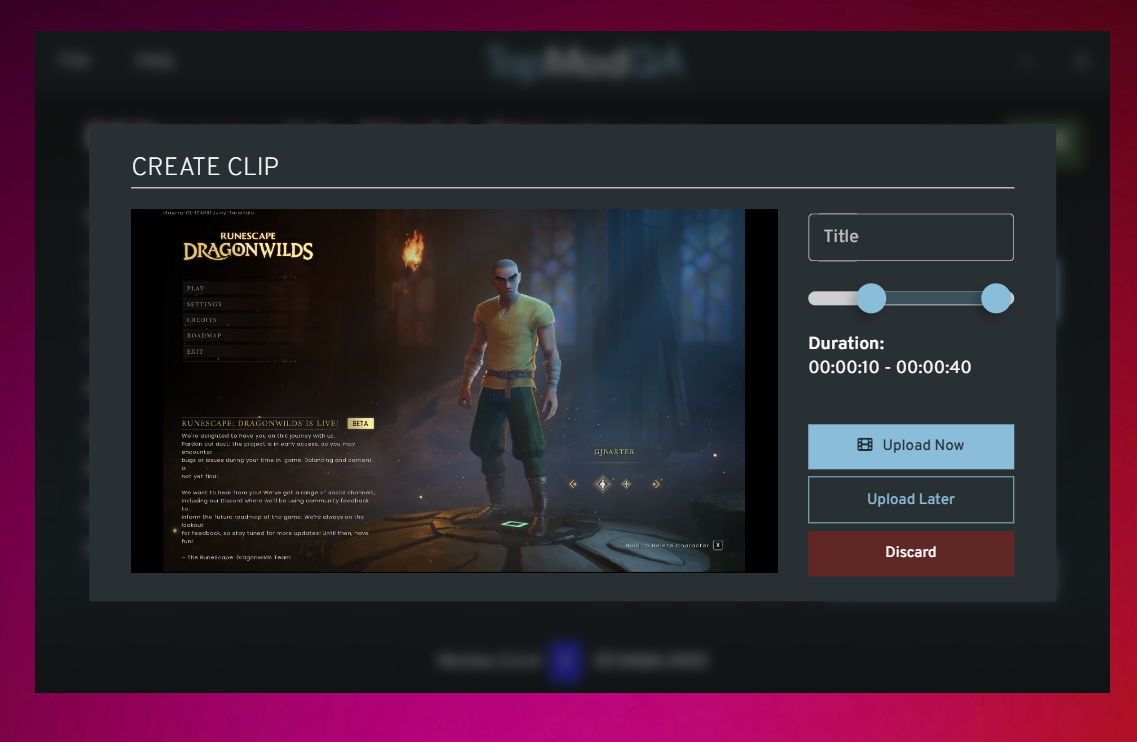
As with the Screenshot event, the Clip modal will appear and you'll be able to playback the Clip that you've just captured. The clipping functionality allows playback of up to 5 minutes and you control the start and end point of the Clip by adjusting the scrubber below the Title input. If you'd rather just capture the full window of the Clip, set the scrubbers to the start and end of the available scrubbing element.
Again, as we did with Screenshots, you can then add a Title to the clip and choose whether you want to Upload the Clip now (making it available in the Dashboard), Upload later or Discard the Clip.
In this instance, click the "Upload Now" button.
12. Finish Recording & Session
Once you are finished recording your Test Session, simply click the "Stop Recording" button in the Session Management panel to end the recording. Please note, you can have multiple Recordings as part of any Session so should you want to restart recording, click "Start Recording".
After the Recording has stopped and the "Live" elements on screen have disappeared, you can decide whether you want to Finish the Session or Cancel the Session. Cancelling the Session discards the whole Session and any Events captured so only do this if you want to completely remove the Session.
If you are ready to Finish the Session, click the "Finish Session" button.
13. Review Session
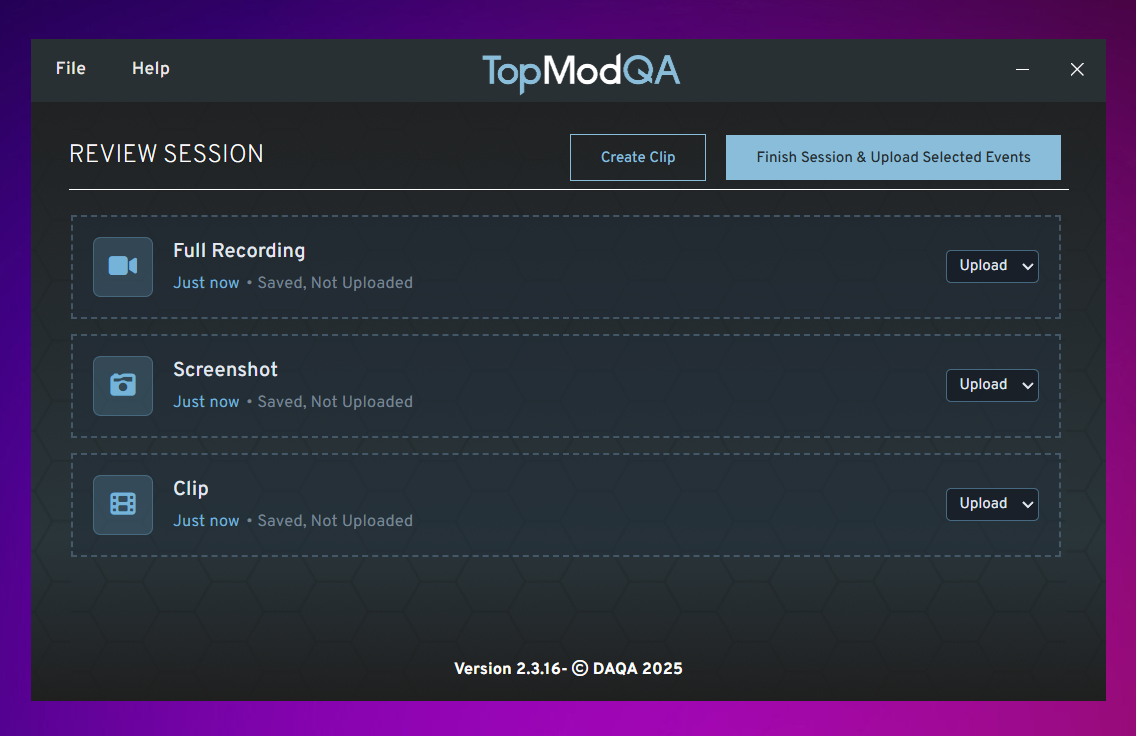
After you have clicked on the "Finish Session" button in the Session Management page, you will then be directed to a final screen where you have the chance to review your captured events. This screen allows you to:
- Decide whether you'd like to upload any Events that you haven't already uploaded.
- Review and recover any previously discarded Events
- Create a new Clip from any of your full Recordings should you have missed anything.
Once you have reviewed all outstanding Events in the Session and finished with your Session, click the "Finish Session & Upload Selected Events". This will start the upload process and take you back to the recording applications homepage where you can see track your upload via the status section.
14. View Session
Now that the Session has finished, you will likely want to view your Session. To do this, find your Session in the "Recent Sessions" section of the Homepage and click the corresponding paperclip icon on the far right of the table. This will copy the URL for the Session to your clipboard.
You can then take this and paste it into your favourite web browser to view the Session in the TopMod QA Dashboard. To find out how to use the Dashboard and find key information related to your Session, read our First Time User Guide of the Dashboard by clicking here - First Time User Guide:... | TopMod QA Docs